Image Configuration
Nutanix’s Image Service is where you can store your build ISOs, as well as Disk Images you create (similar to VMware Templates).
We will upload CentOS ISO to use for deploying VMs.
In Prism Central > Explore, click Images.
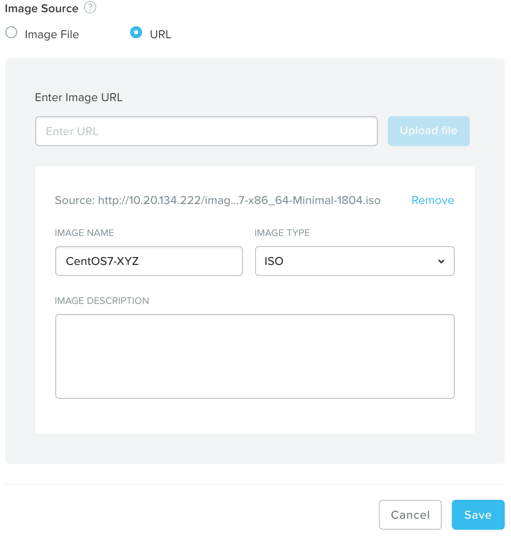
Next click Add Image, and click URL.
Fill out the following fields and click Upload File:
Next, fill out the following fields and click Save:
- Image Name - CentOS7-initials
- Image Type - ISO
- Image Description - (Optional) Add a description
Note
Image management in Prism Central allows you to upload images that can be used to deploy workloads in any of the clusters registered to that Prism Central instance.
Now we will upload Windows 2012 ISO to use for deploying VMs, if the cluster doesn’t already have this image available.
Click Add Image, and click URL.
Fill out the following fields and click Upload File:
Next, fill out the following fields and click Save:
- Image Name - Windows2012-initials
- Image Type - ISO
- Image Description - (Optional) Add a description
Note
Image management in Prism Central allows you to upload images that can be used to deploy workloads in any of the clusters registered to that Prism Central instance.
An image can also be uploaded directly from a cluster’s Prism Element.
This tool can also convert VM disk images to formats that AHV can understand.
The image service supports raw, vhd, vhdx, vmdk, vdi, iso, and qcow2 disk formats.
Creating a Linux VM
Deploy a Linux VM from Prism Central.
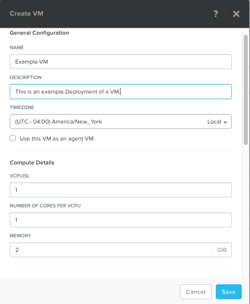
In Prism Central > Explore > VMs, click Create VM.
Fill out the following fields and click Save:
- Name - Linux_VM-initials
- Description - (Optional) Description for your VM.
- vCPU(s) - 1
- Number of Cores per vCPU - 1
- Memory - 2 GiB
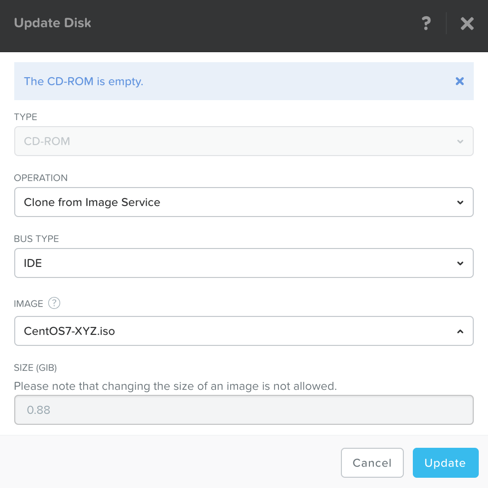
- Select next to CDROM
- Operation - Clone from Image Service
- Image - CentOS7-initials (The Image we added above)
- Select Update
- Select + Add New Disk
- Type - DISK
- Operation - Allocate on Storage Container
- Storage Container - Default Container
- Size (GiB) - 30 GiB
- Select Add
- Select Add New NIC
- VLAN Name - Primary
- Select Add
Click Save to create the VM.
Creating a Windows VM
Deploy a Windows VM from Prism Central.
Note
Nutanix provides a set of guest tools and drivers comparable to VMware Tools. To install a Windows-based OS, the I/O drivers must be provided at install time. Nutanix provides a customized set of virtualized I/O drivers for Windows OS on AHV.
In Prism Central > Explore > VMs, click Create VM.
Fill out the following fields and click Save:
- Name - Windows_VM-initials
- Description - (Optional) Description for your VM.
- vCPU(s) - 2
- Number of Cores per vCPU - 1
- Memory - 4 GiB
- Select next to CDROM
- Operation - Clone from Image Service
- Image - Windows2012-initials
- Select Update
- Select + Add New Disk
- Type - DISK
- Operation - Allocate on Storage Container
- Storage Container - Default Container
- Size (GiB) - 30 GiB
- Select Add
- Select + Add New Disk
- Type - CDROM
- Operation - Clone from Image Service
- Image - Nutanix VirtIO
- Select Add
- Select Add New NIC
- VLAN Name - Primary
- Select Add
Click Save to create the VM.
Now lets power on the VM:
Select the VM, then click Power On from the Actions drop-down menu.
Next lets open a console session:
Select the VM, then click Launch Console from the Actions drop-down menu.
Progress through the standard install questions until you reach the Windows install location.
Note
Choose Datacenter with GUI and Custom installation when presented with the choice.
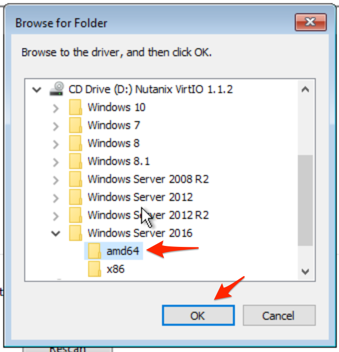
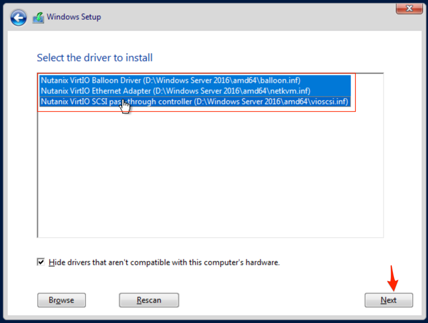
Click Load Driver and navigate to the CD where the Nutanix VirtIO is mounted.
Browse the CD, and select the directory that corresponds to the Windows OS being installed.
Select the three Nutanix drivers displayed (Press and hold the Ctrl key and select all three drivers):
- Balloon
- Ethernet adapter
- SCSI passthrough controller
Click Next.
After the drivers are loaded, the disk created in step 1 appears as an installation target. Select that disk and continue with the normal install process.
After the installation completes, the Windows install ISO can be unmounted and the additional CD-ROM used for the drivers can be removed from the VM.
Note
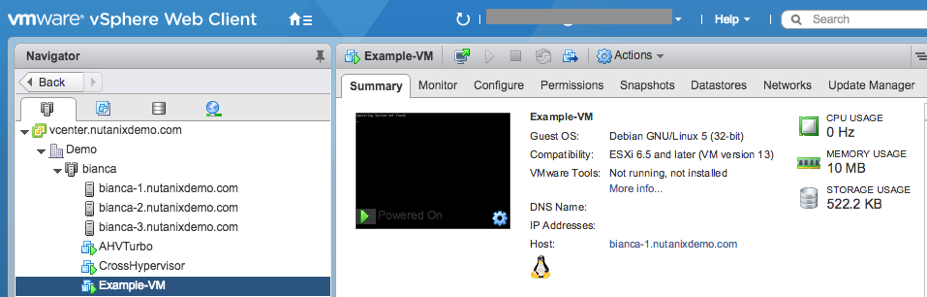
In ESXi:
- After a VM is created via VMware vSphere, it appears in the Prism VMs list.
- Alternatively, if a VM is created via Prism, it appears in the VMware vSphere UI. An example is shown in the image below.