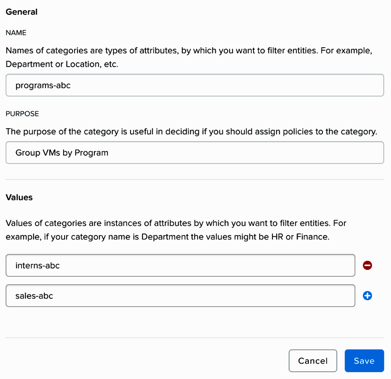
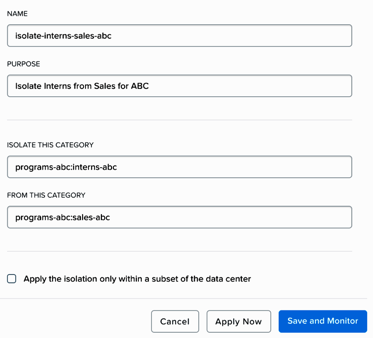
Flow: Isolate Environments

Overview

Note

Estimated time to complete: 15-30 MINUTES

In this exercise you will create a category with different values. Then you will create and implement an isolation security policy that uses the newly created category in order to restrict unauthorized access.

Isolate Environments with Flow

Create a New Category

Log on to the Prism Central environment and navigate to Explore > Categories.

Note

There should be default categories present. Now you will create a custom category to add to the list as well.

Click New Category.

Fill out the following fields and click Save:

  • Name - Programs-abc, replacing abc with your initials.
  • Purpose - This category will be used to tag VMs belonging to the program called “Programs-abc”, as an example. This category will have “intern” and “sales” values in order to differentiate intern and sales VMs within the programs-abc category.
  • Values - interns-abc.
  • Values - sales-abc.
../_images/create_category.png

Create a New Security Policy

Navigate to Explore > Security Policies within Prism Central.

Click Create Security Policy > Select Isolate Environments.

Fill out the following fields:

  • Name - isolate-interns-sales-abc, replacing abc with your initials.
  • Purpose - Isolate intern vm traffic from sales.
  • Isolate This Category - programs-abc:interns-abc.
  • From This Category - programs-abc:sales-abc.

Do NOT select the check box for Apply the isolation only within a subset of the data center.

  • Enter interns-abc as a possible value of this category, replacing abc with your initials.
  • Click the plus sign and enter sales-abc as another value in this category, replacing abc with your initials.
  • Click Apply Now to save and apply the policy.

Note

The Save and Monitor button allows you to save the configuration and monitor how the security policy works without applying it.

../_images/create_isol_pol.png

Apply the New Security Policy

Confirm communication is possible before applying the categories to the VMs

Navigate to Explore > VMs.

Open the VM console of flow-abc-3 and flow-abc-4 by selecting one VM at a time then clicking on the checkbox next to it.

Click Actions > Launch Console.

Log into both VMs and find the ips of the VMs via the command ifconfig. Ping from the flow-abc-3 VM to the flow-abc-4 VM.

Note

The pings should succeed because these two VMs do not yet have categories assigned.

Assign a category to the VMs flow-abc-3 and flow-abc-4

Navigate to Explore > VMs.

Select flow-abc-3 and click Actions > Manage Categories.

In the Set Categories text box on the left side of the UI, type intern and select programs-abc:interns-abc from autocomplete. Click Save.

Select flow-abc-4 and click Actions > Manage Categories.

In the Set Categories text box on the left side of the UI, type sales and select Actions > Manage Categories programs-abc:sales-abc from autocomplete. Click Save.

Confirm communication is NOT possible after applying the categories to the VMs

Open the VM console of flow-abc-3 and flow-abc-4.

Log into both VMs and ping from the flow-abc-3 VM to the flow-abc-4 VM.

Note

The pings should NOT succeed because these two VMs now belong to the programs-abc:intern-abc and programs-abc:sales-abc categories and the policy isolate-interns-sales-abc, which was created earlier, isolates these two types of VMs.

Takeaways

  • In this exercise you also created categories and an isolation security policy with ease without having to alter or change any networking configuration.
  • After tagging the VMs with the categories created, the VMs simply behaved according to the policies they belong to.