Overview
Note
Estimated time to complete: 10-20 MINUTES
In this exercise you will enable Nutanix Flow, formally known as Microsegmentation, and create the VMs to be used throughout the remaining Flow exercises, if you have not cloned the VMs already as part of the Lab - Deploying Workloads exercise.
Enabling Microsegmentation
Open https://<Prism-Central-IP>:9440/ in the Chrome browser and log in.
Note
Do not use Firefox for the Flow policy steps in the following exercises.
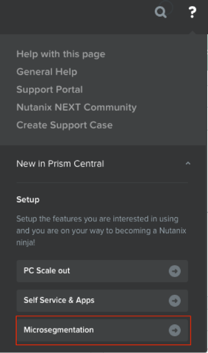
From the navigation bar, click the question mark at the top right corner and expand the New in Prism Central section of the menu.
Click Microsegmentation.
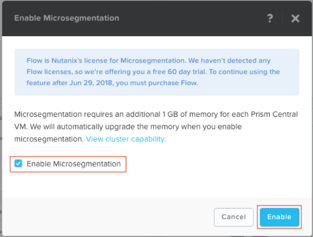
Select the Enable Microsegmentation check box within the Enable Microsegmentation dialog box.
Note
Flow can only be enabled once per Prism Central instance. If Microsegmentation displays a green check mark next to it, that means Microsegmentation has already been enabled for the Prism Central instance being used.
Click Enable
Create Five VMs
Note
Please use the VM you created in the “Deploy VM Lab”, and make 4 clones. Otherwise follow the instructions to create a VM and clone it.
Now you will create the five virtual machines you will use to test the capabilities of Nutanix Flow. Create these virtual machines from the base VM in Prism Central called CentOS.
In Prism Central > Explore > VMs, click Create VM.
Fill out the following fields and click Save:
- Name - flow-<your_initials>-1
- Description - Flow testing VM
- vCPU(s) - 2
- Number of Cores per vCPU - 1
- Memory - 4 GiB
- Select + Add New Disk
- Operation - Clone from Image Service
- Image - CentOS
- Select Add
- Remove CD-ROM Disk
- Select Add New NIC
- VLAN Name - Primary
- IP Address - 10.21.XX.42
- Select Add
Clone the other four VMs:
Take that VM and clone it four times to have a total of five VMs named as follows:
flow-<your_initials>-1
flow-<your_initials>-2
flow-<your_initials>-3
flow-<your_initials>-4
flow-<your_initials>-5
Select the flow-<your_initials>-1 VM and click Actions > Clone.
- Number of Clones - 4
- Prefix Name - flow-<your_initials>-
- Starting Index Number - 2
Select the five newly created Flow VMs and click Actions > Power on.