Creating Blueprint (MySQL)
In this exercise you will explore the basics of Nutanix Calm by building and deploying a Blueprint that installs and configures a single service, MySQL, on a CentOS image.
Depending on how comfortable you are with SSH Keys, in this lab you’ll have two options:
- Cloud Track - We’ll use a Cloud based CentOS image which does not allow password based authentication, instead it relies on SSH keys. Most Public Clouds authenticate in this manner. If you’re comfortable with SSH keys, we recommend you follow this track.
- Local Track - We’ll use a local CentOS image which allows password based authentication. If you’ve never used SSH keys before, we recommend you follow this track.
Creating Blueprint
From Prism Central > Apps (Prism Central > Calm if you’re running 5.8.1 or later), select Blueprints from the sidebar and click + Create Application Blueprint.
Specify CalmIntro<INITIALS> in the Blueprint Name field.
Enter a Description in the Description field.
Select Calm from the Project drop down menu and click Proceed.
Click Proceed to continue.
Click Credentials > and depending on which track you’re on, do one of the two following steps:
Cloud Track:
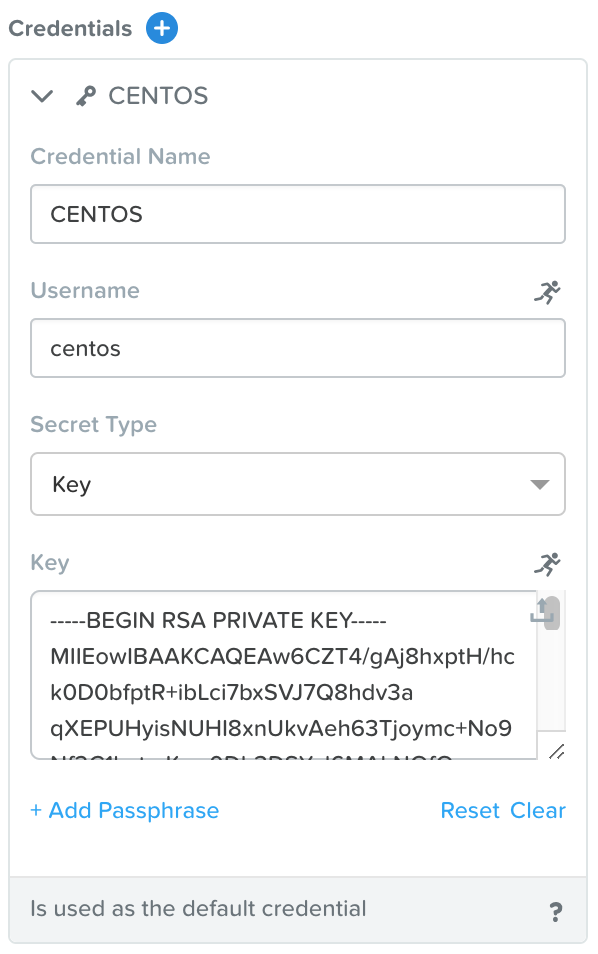
- Credential Name - CENTOS
- Username - centos
- Secret - Key
- Key - Paste in your private key from the previous lesson
Local Track:
- Credential Name - CENTOS
- Username - root
- Secret - Password
- Password - nutanix/4u
Click Save, and then Back.
Note
Credentials are unique to each Blueprint.
Each Blueprint requires a minimum of 1 Credential.
Click Save to save your Blueprint.
Setting Variables
Variables allow extensibility of Blueprints, meaning a single Blueprint can be used for multiple purposes and environments depending on the configuration of its variables. Variables can either be static values saved as part of the Blueprint or they can be specified at Runtime (when the Blueprint is launched). By default, variables are stored in plaintext and visible in the Configuration Pane. Setting a variable as Secret will mask the value and is ideal for variables such as passwords.
Variables can be used in scripts executed against objects using the @@{variable_name}@@ construct. Calm will expand and replace the variable with the appropriate value before sending to the VM.
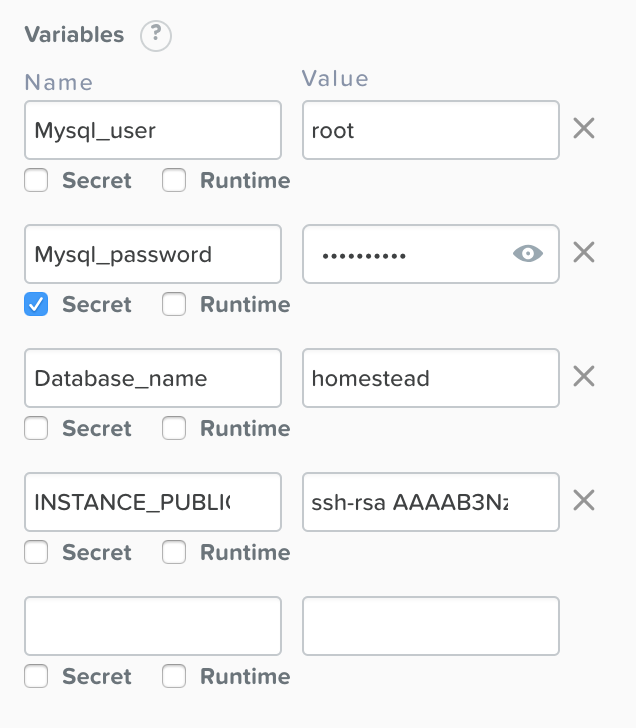
In the Configuration Pane under Variable List, fill out the following fields:
| Variable Name |
Value |
Secret |
| Mysql_user |
root |
|
| Mysql_password |
nutanix/4u |
X |
| Database_name |
homestead |
|
| INSTANCE_PUBLIC_KEY |
Only required for the Cloud Track.
Paste in your public key from the previous lesson. |
|
Click Save.
Adding a Downloadable Image
All VMs in AHV are based off of a disk image. You have the option of selecting an image that’s already managed by Prism Central (Local Track), or specifying a Downloadable Image via a URI (Cloud Track). If the latter is chosen, during the application deployment Prism Central will automatically download and create the image specified. If an image with the same URI already exists on the cluster, it will skip the download and use that instead.
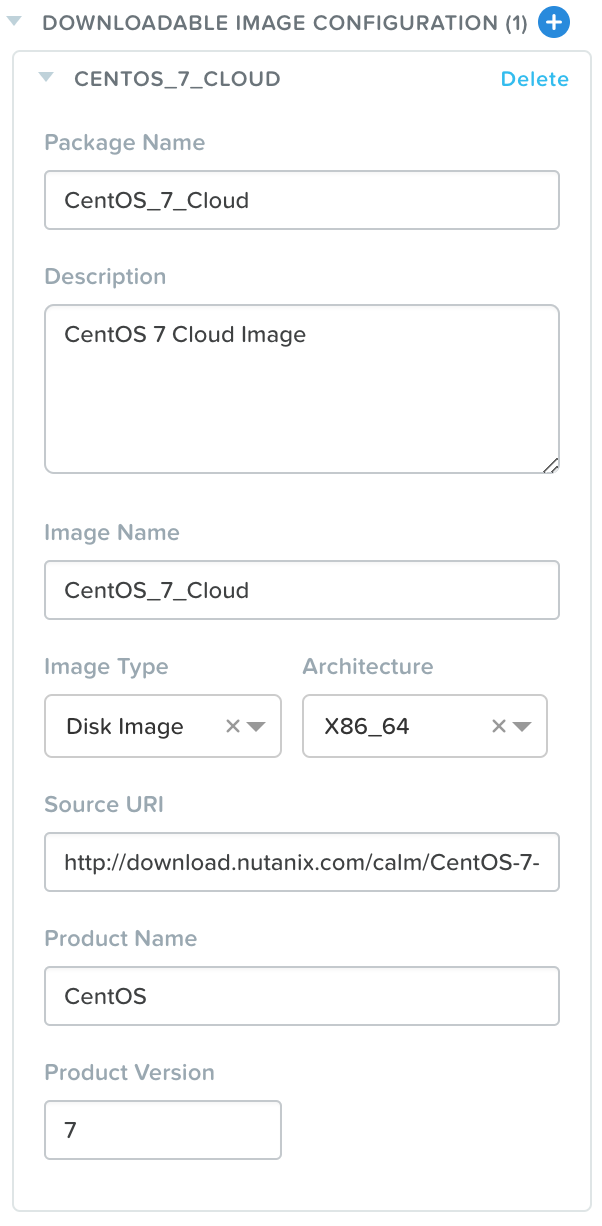
If you’re on the Cloud Track, then follow these steps. If you’re on the Local Track, skip to the next section (Adding DB Service). Near the top, click Configuration > Downloadable Image Configuration and fill out the following fields:
Note
This Cloud based image is the same that’s used for the majority of the Nutanix Pre-Seeded Application Blueprints.
Click Back and then Save.
Adding DB Service
Note
Application Overview - The pane within the Blueprint Editor used to create and manage Blueprint Layers. Blueprint Layers consist of Services, Application Profiles, and Actions.
In Application Overview > Services, click .
Note Service1 appears in the Workspace and the Configuration Pane reflects the configuration of the selected Service.
Fill out the following fields:
- Service Name - MySQL
- Name - MySQLAHV
Note
This defines the name of the substrate within Calm. Names can only contain alphanumeric characters, spaces, and underscores.
Cloud - Nutanix
OS - Linux
VM Name - MYSQL-@@{calm_array_index}@@-@@{calm_time}@@
Image
- Cloud Track - CentOS_7_Cloud
- Local Track - CentOS
Device Type - Disk
Device Bus - SCSI
Select Bootable
vCPUs - 2
Cores per vCPU - 1
Memory (GiB) - 4
Guest Customization - Depending on your track:
Select under Network Adapters (NICs)
NIC - Primary
Credential - CENTOS
Click Save and ensure no errors or warnings pop-up. If they do, resolve the issue, and Save again.
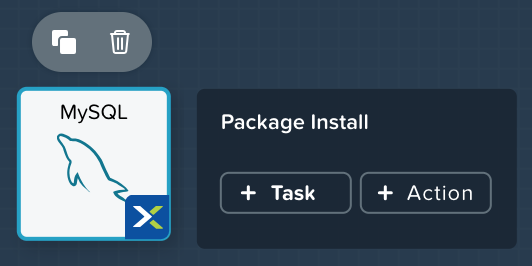
With the MySQL service icon selected in the workspace window, scroll to the top of the Configuration Panel, click Package. Name the Package as MYSQL_PACKAGE, and then click the Configure install button.
On the Blueprint Canvas section, a Package Install field will pop up next to the MySQL Service tile:
Click on the + Task button, and fill out the following fields on the Configuration Panel on the right:
- Name Task - Install_sql
- Type - Execute
- Script Type - Shell
- Credential - CENTOS
Copy and paste the following script into the Script field:
#!/bin/bash
set -ex

sudo yum install -y "http://repo.mysql.com/mysql-community-release-el7.rpm"
sudo yum update -y
sudo setenforce 0
sudo sed -i 's/enforcing/disabled/g' /etc/selinux/config /etc/selinux/config
sudo systemctl stop firewalld || true
sudo systemctl disable firewalld || true
sudo yum install -y mysql-community-server.x86_64

sudo /bin/systemctl start mysqld
sudo /bin/systemctl enable mysqld

#Mysql secure installation
mysql -u root<<-EOF

UPDATE mysql.user SET Password=PASSWORD('@@{Mysql_password}@@') WHERE User='@@{Mysql_user}@@';
DELETE FROM mysql.user WHERE User='@@{Mysql_user}@@' AND Host NOT IN ('localhost', '127.0.0.1', '::1');
DELETE FROM mysql.user WHERE User='';
DELETE FROM mysql.db WHERE Db='test' OR Db='test\_%';

FLUSH PRIVILEGES;
EOF

mysql -u @@{Mysql_user}@@ -p@@{Mysql_password}@@ <<-EOF
CREATE DATABASE @@{Database_name}@@;
GRANT ALL PRIVILEGES ON homestead.* TO '@@{Database_name}@@'@'%' identified by 'secret';

FLUSH PRIVILEGES;
EOF
Note
You can click the Pop Out icon on the script field for a larger window to view/edit scripts.
Looking at the script you can see the package will install MySQL, configure the credentials and create a database based on the variables specified earlier in the exercise.
Select the MySQL service icon in the workspace window again and scroll to the top of the Configuration Panel, click Package.
- Click - Configure Uninstall
- Click - + Task
- Name Task - Uninstall_sql
- Type - Execute
- Script Type - Shell
- Credential - CENTOS
Copy and paste the following script into the Script field:
#!/bin/bash
echo "Goodbye!"
Note
The uninstall script can be used for removing packages, updating network services like DHCP and DNS, removing entries from Active Directory, etc. It is not being used for this simple example.
Click Save. You will be prompted with specific errors if there are validation issues such as missing fields or unacceptable characters.
Launching the Blueprint
From the toolbar at the top of the Blueprint Editor, click Launch.
In the Name of the Application field, specify a unique name (e.g. CalmMySQL*<INITIALS>*-1).
Note
A single Blueprint can be launched multiple times within the same environment but each instance requires a unique Application Name in Calm.
Click Create.
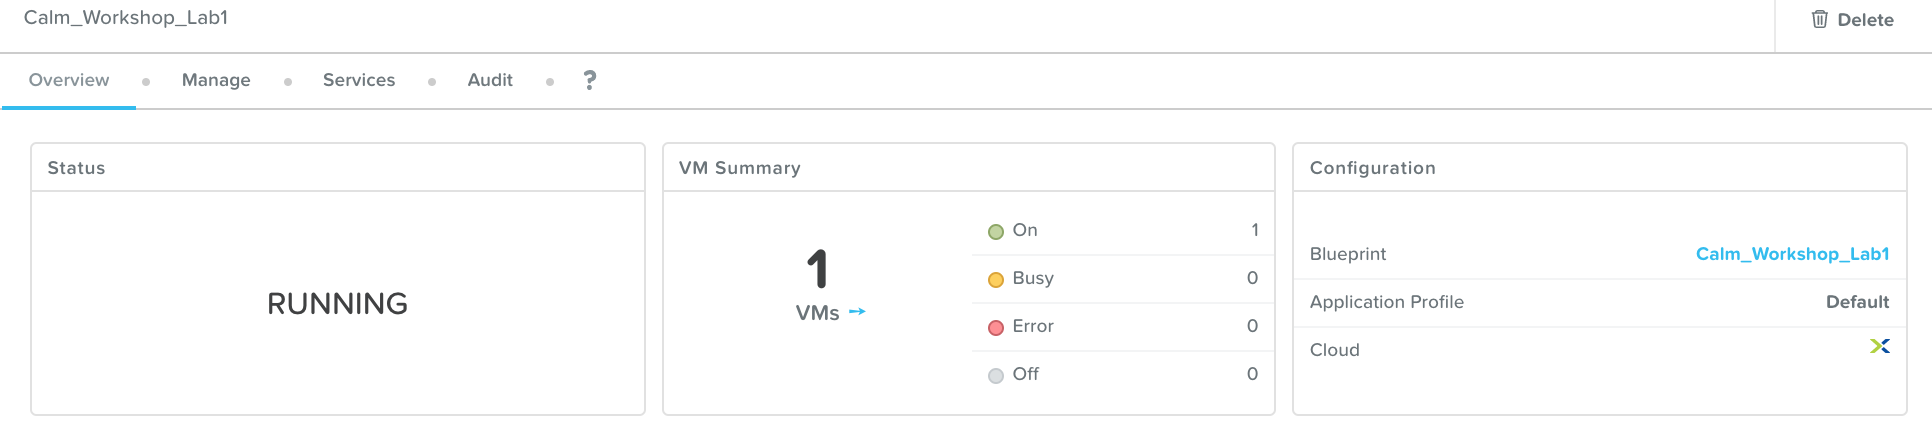
You will be taken directly to the Applications page to monitor the provisioning of your Blueprint.
Select Audit > Create to view the progress of your application. After MySQLAHV - Check Login is complete, select PackageInstallTask to view the real time output of your installation script.
Note the status changes to Running after the Blueprint has been successfully provisioned.